The secret sauce of infinite world
Everyone has played at least one GTA game in their life. I started with GTA: Vice City back when I was 10 years old. I was fascinated by how a game could hold all those buildings, characters, and everything else, and how it all worked seamlessly on just 1GB of RAM. I was amazed, but I didn't think much of it at the time. When I got older and started learning about graphics, that was one of the first things I felt I had to understand—even if I never ended up using it, just to know how it worked. Even though modern GPUs have vastly more VRAM, we're still constrained by memory budgets; we can't just load all meshes at once.
Let's ignore how it really works for a second. If you were building a streaming world without the internet, how would you do it?... You guessed right: split the world into small scenes. For each scene, give it a position in your main game world and a bounding box. When the player steps inside that bounding box, load the scene.
Well, that sounds right, but doing that naively for every single region gets heavy fast. Imagine having 100 regions in your world (making regions small, but not tiny, is a good approach to avoid high memory bandwidth spikes). Every single frame, you would be forced to test the player against all 100 regions.
I know the CPU can do 100 checks in an instant, but in computer graphics you have a strict frame budget for everything if you want to hold a stable 60 FPS.
Luckily, we have a data structure built for this exact use case: AABB BVH (Axis-Aligned Bounding Box Bounding Volume Hierarchy). It's a common technique used heavily in physics engines to test colliders because, again, if you have 5,000 entities with colliders in your scene, testing against every single entity every frame will kill your framerate.
AABB BVH
BVH is a tree-based data structure whose main job is to quickly test a query volume (like a ray in physics, or a sphere around the player in our streaming system) against bounding boxes.
Before going through how this tree is built, let's look at how querying it actually works:
- Test Node: Check if our query volume (or ray) intersects with the bounding box of the current node.
- Cull: If the query misses the bounding box of the node, the entire subtree under it is skipped (culled) right away.
- Traverse Hits: If the query intersects, we keep testing the child nodes down the tree until we reach a leaf.
The concept is pretty simple. Now, how does a BVH pull this off? It relies on two main components:
- AABB (Axis-Aligned Bounding Box): In plain English, an AABB is a rectangular box that never rotates. Because it stays aligned to the world axes, it can be defined by just two points:
$$\mathbf{P}_{\min} = \begin{pmatrix} x_{\min} \\ y_{\min} \\ z_{\min} \end{pmatrix} \qquad \mathbf{P}_{\max} = \begin{pmatrix} x_{\max} \\ y_{\max} \\ z_{\max} \end{pmatrix}$$
drag a point to move it · drag empty space to rotate
- BVH (Bounding Volume Hierarchy): A binary tree where:
- Root Node: A single bounding box enclosing all regions in the world.
- Internal Nodes: Bounding boxes that tightly enclose the union of their two child nodes.
- Leaf Nodes: Bounding boxes containing the actual primitives (world regions in our case).
There are several ways to build a BVH tree. I went with a Top-Down Median Split along the longest centroid axis. Here is how it works step by step:
- 1. Enclose Everything & Find Centroids: We start at the root node with all world regions in a single flat array. For the current range of regions
[begin, end), we loop through them once to compute two boxes:- Node AABB (
bounds): The tight bounding box enclosing all regions in this node. - Centroid Bounds (
centerMin,centerMax): A bounding box enclosing only the center points of those regions: $$\mathbf{C} = (\mathbf{P}_{\min} + \mathbf{P}_{\max}) \times 0.5$$
- Node AABB (
- 2. Pick the Split Axis: We check how spread out the region centers are by computing the centroid extent: $$\mathbf{E} = \mathbf{C}_{\max} - \mathbf{C}_{\min}$$ Whichever axis ($X$, $Y$, or $Z$) has the largest extent becomes our split axis. Splitting along the longest axis keeps the boxes roughly cube-shaped instead of turning them into long, thin slivers (which are terrible for culling).
- 3. Check the Leaf Condition: If the number of regions left in this node is small enough (
count <= kLeafSize) or all their centers sit on the exact same point (extent[axis] <= 0), we stop splitting and mark this node as a Leaf Node pointing directly to those regions. - 4. Partition Around the Median (
std::nth_element): Instead of running a full $O(N \log N)$ sort at every step, we grab the middle indexmiddle = begin + count / 2and use C++'sstd::nth_element($O(N)$ average time) to partition our regions in-place along the chosen axis:- Left Half
[begin, middle): Regions whose centers sit on the lower side of the median. - Right Half
[middle, end): Regions whose centers sit on the upper side of the median.
- Left Half
- 5. Allocate Contiguous Children & Recurse: To keep the tree cache-friendly without pointer chasing, all nodes live inside a flat
std::vector<Node>. We push two new child nodes atleftandleft + 1, set the current node'scount = 0(which flags it as an internal node wherefirstpoints toleft), and recursively callSubdivideon both halves.
Traversing the Tree (Sphere Query)
Once the tree is built, streaming our world is just a matter of placing a sphere around the player (with a radius equal to our streaming distance) and querying the BVH each frame using an iterative stack:
- Closest-Point Distance Check: To test if a sphere with center $\mathbf{P}$ and radius $r$ touches a node's AABB, we clamp $\mathbf{P}$ to the box's $[\mathbf{P}_{\min}, \mathbf{P}_{\max}]$ bounds to get the closest point on the box, then check if the squared distance is within $r^2$: $$\mathbf{\Delta} = \mathbf{P} - \operatorname{clamp}(\mathbf{P}, \mathbf{P}_{\min}, \mathbf{P}_{\max}), \qquad \mathbf{\Delta} \cdot \mathbf{\Delta} \le r^2$$
- Subtree Culling: We pop a node from our fixed-size stack. If $\mathbf{\Delta} \cdot \mathbf{\Delta} > r^2$, the player is too far away, so we immediately skip (cull) this node and all regions buried inside its subtree.
- Drill Down to Leaves: If it intersects and is an internal node (
count == 0), we push its two children onto the stack. If it's a leaf (count > 0), we test the individual regions inside and stream in the hits.
drag yellow center to move player · drag sphere rim to resize radius · use buttons above to step through build splits
With the BVH in place, it's time to build the region streaming—or at least the way I did it.
While researching, I saw people doing this using separate scenes in Unity. That concept makes sense, but it felt wrong to me because it would be hell to debug, if you ask me. So I went with another approach that works better for my engine.
A scene is a collection of entities and their components that get displayed to the user. I think everybody knows that, but for my engine, I added another layer on top of it that I call world regions. Inside the scene file, each region is stored as a section with a bounding box and the entities inside it.
Here is what the region control panel looks like in my engine:
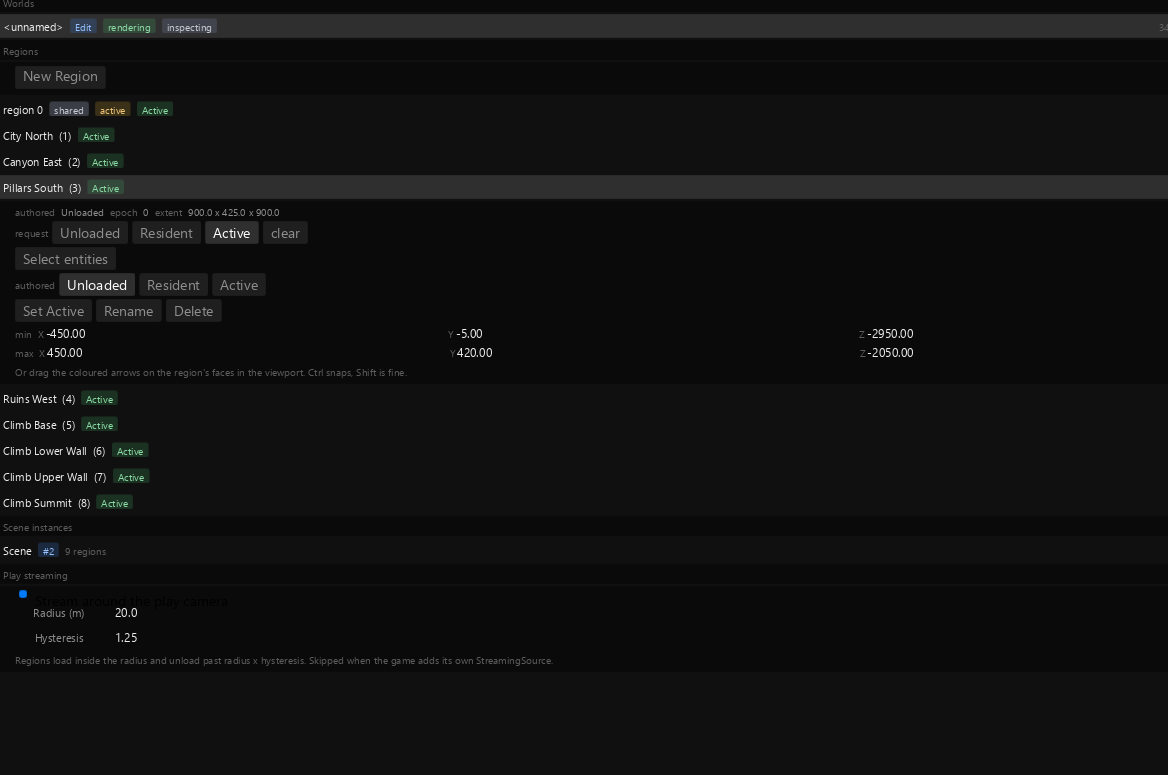
The developer can create regions easily and define the bounding box, and entities inside it get linked automatically to that bounding box.
It looks simple, but the panel mixes three different things: what the region is (actual state), what it's asked to be (desired state), and what the scene file says (authored state). On top of that, one button, "Set Active", is a fourth thing that has nothing to do with loading. Let's go through them one by one.
The four states
| State | Meaning |
|---|---|
| Unloaded | No entities exist. Only the region entity with its metadata. |
| Resident | Entities exist. The region is loaded and kept in the world. |
| Active | Entities exist, render, and tick. |
| Unloading | A one-frame step: queries skip the region's entities. On the next frame its content is dropped and it becomes Unloaded. |
What each part of a region row shows
The collapsed row:
- State badge: the actual state.
-> X: the desired state. It's shown only when it differs from the actual one, which means the region is still transitioning.N src: how many streaming sources are asking for this region in the current frame.load failed: the read or parse failed, and it won't retry.
Expand it and you get more:
- authored (text): the region's state line in the scene file.
- request (Unloaded / Resident / Active / clear): an override. It beats the authored state, every streaming source, and the editor's load-everything mode, and it stays until you press clear. The highlighted button is the current desired state, not "which override you set". In the edit world that's always Active.
- Select entities: selects the region's members.
The trap here is that an override left set during Play makes streaming look broken, because that region ignores the player completely.
Then there is the authoring section, which only exists in the edit world:
- authored (Unloaded / Resident / Active): writes the scene file's state line. It's undoable and saved, and it's the starting value that desired resets to every frame.
- Set Active: makes this the region new entities get created in. It has nothing to do with the Active load state. The two names collide, and it should probably be called something like "Make current".
- Rename / Delete / min-max bounds: these edit the region itself.
One more thing: the Unload button on a scene instance row unloads the whole scene, not one region.
How desired is computed every frame
- Start value: the authored state. In the editor's edit world it's Active for every region instead, because the editor loads everything for editing.
- Streaming sources: each source whose radius reaches the region's box raises it to the source's target (usually Active). A region that's already loaded is tested against
radius × hysteresis. - Region 0: it's raised to at least Resident whenever any other region is loaded or wants to be.
- Override: if one is set, it replaces the result entirely.
After that, each region takes one transition per frame:
- Unloaded → loaded: waits for region 0 to load first, reads the region's bytes, then creates its entities.
- Resident ↔ Active: just a state change. Nothing is loaded or dropped.
- Loaded → Unloading → Unloaded: region 0 unloads last.
Common cases
| Situation | Result |
|---|---|
| Edit world, nothing touched | Every region Active, whatever its authored state |
| Edit world, request Unloaded | Region unloads; the override beats load-everything |
| Play, authored Unloaded, player far away | Unloaded |
| Play, player within radius | Active, if the source's target is Active |
| Authored Resident or Active | Always loaded, at any distance |
| Override set | Ignores everything until you press clear |
Regions around the player need to be loaded and rendered (Active), but they can still be heavy when the player is far away from them. Loading every full-resolution model is overkill. Imagine standing 50m away from a model: you don't see nearly as much detail at 50m as you do at 3m. That's where LODs come in.
While iterating on my game engine, I used a traditional G-Buffer for a long time. It worked fine with no issues, but for my latest iteration, I decided to try a Visibility Buffer—especially since my shading language supports what I call material passes, which is the ability to export variants of a shader written by the developer to use in different cases.
Currently, I use this concept in two places: the Visibility Buffer and Global Illumination. Someone might ask why I don't just use the G-Buffer in GI. That's because the G-Buffer culls everything behind the camera, whereas things behind you can still bounce light and influence the scene you're looking at, so GI needs its own pass.
From the G-Buffer, I moved to a full Nanite-style clustering system, which—you guessed it—also has great support for LOD selection.
From importing a model to displaying it on screen, we run through a chain of operations to deliver an optimized LOD-based model.
The first step is Importing the Model. Importing a model into the engine was one of the hardest steps so far because the technical details are insane, so let's walk through it step by step.
Prepare Source Mesh
To prepare the source mesh, the engine does four small steps:
- Expand sub-meshes into individual mesh objects so each cluster later handles only one material.
- Use the
meshoptimizerlibrary to optimize the model for overdraw, vertex caching, and so on. - Validate the geometry and run any needed operations on the UVs.
- Compute the bounding box for the mesh.
Cluster The Mesh (LOD0)
In this stage, we use meshoptimizer again, but this time to create meshlets with meshopt_buildMeshlets.
This produces clusters ready for LOD0, which is still the original full-detail model, just split up and ready for the visibility buffer.
A meshlet is a small patch of the mesh capped at 64 vertices and up to 126 triangles.
Build The DAG (LOD1 to LOD_Max)
The developer can choose the maximum number of LODs for each model (by default it's 1, which means just LOD0). While testing, I used up to LOD7, which worked pretty well.
We loop through LODs from 1 up to the maximum and run the exact same steps:
- Merge neighbours into groups: Clusters that touch each other in LODN-1 are bundled together, about 8 per group.
- Freeze the border: We count how often each edge is used inside the group. Any edge on the outer border gets locked in place.
- Simplify the inside: The inside of each group is reduced to about half of its triangles. The border can't move, so two neighbouring groups always agree on the edge they share.
- Measure the error: After simplifying, we measure how far the new surface moved from the old one. We add that to the biggest error already recorded in the group's children, so the error only grows when we go coarser—it never shrinks. The group also gets a sphere that encloses all of it and all of its children.
- Cut it back into clusters: The simplified group is split back into clusters again. These new clusters become LODN.
- Stamp both sides: The new clusters record "I came from a group with this error and this sphere". The old clusters record "my parent group has this error and this sphere". Same pair of numbers on both sides.
Vertices that sit at the same position, like the ones on a texture seam, are treated as one vertex when we lock the border. Without that, one side of the seam stays locked and the other side walks away, and you get a crack that only shows on textured models.
So LOD1 is built from LOD0's clusters, LOD2 from LOD1's, and so on. Every step roughly halves the triangle count, so a one-million-triangle model needs about 14 steps to get down to a single cluster (my own math, not a measured cook). All the levels together end up about twice the size of LOD0 because the sizes shrink by half every time.
Why Stamping Both Sides Matters
This is the trick that makes everything work. At runtime the GPU asks every cluster two questions:
- Am I detailed enough for this distance? My own error is smaller than one pixel.
- Would my parent already be good enough? My parent's error is still bigger than one pixel.
It draws the cluster only if the first answer is yes and the second one is no. Because both levels use the same error and the same sphere, exactly one side of every group boundary gets drawn. No gaps, no overlaps, no cracks. And because every group decides as a whole, the part of the model close to the camera can be detailed while the far part is coarse, on the same model.
That's also the reason I didn't go with the simple way of making LOD0, LOD1, LOD2 as separate copies. If every level is simplified on its own, there is no relationship between a coarse triangle and the fine triangles it replaced, so you can only pick one level for the whole model.
When a Group Can't Be Simplified
It happens. A lone cluster, a group that is too small, or a group where nothing can collapse. Those clusters stay as they are and they stay visible for every distance beyond their own error. We also copy them into every coarser level, so each level is still a complete model when drawn alone.
The loop stops when one cluster is left, when we reach the maximum number of LODs, or when a whole step fails to reduce the triangle count. In the last case, that step is thrown away. The cook also fails completely if the result can't be trusted, because a half-built chain is a model that silently loses a piece at some distance, and that is much worse than refusing to import it.
Writing The Result
- Every level has its own compact list of vertices. A coarse level uses about half the vertices of the level below it, so it doesn't pay for vertices it doesn't use.
- Every cluster takes the same fixed space. The empty slots are filled with triangles with zero area, which the GPU throws away before doing any work. The fixed size lets the visibility buffer find the cluster of a triangle with a simple bit shift.
- The vertices are packed into 32 bytes: 16-bit positions inside the model bounds, packed normals and tangents, and half-float UVs.
- Every level stores its biggest parent error. This is the most important number for the next step because it tells us when a level stops being useful.
Second Step: Choosing The LOD
Overview: every frame, for every instance in the world, the renderer calculates how big the error is on the screen and uses it to decide which levels it needs in memory.
The number is how many pixels does one unit of error cover right now. It depends on the distance to the nearest point of the model, the scale of the instance, and the resolution and field of view of the camera. I use the same camera as the GPU culling, so the CPU agrees with what the GPU is going to draw.
Then the rule is simple: a level is needed as long as its biggest parent error, multiplied by that number, is more than one pixel. Once it's under one pixel, nobody will see the difference, so that level and every finer one is not needed.
From that, each model gets three answers:
- Fit: the finest level the GPU might still draw right now.
- Keep: the same test but with a 30% margin. We keep levels a little longer than we need them, so a camera moving back and forth doesn't load and unload the same level every few frames. Same idea as the hysteresis in the regions.
- Wanted: the fit plus a global bias. The bias is a number that goes up when the system is under pressure (more on that later). It only changes what we load, never what we keep.
If a model has many instances we take the finest answer of all of them. Models cooked before the error existed still work with a fallback that uses the distance only.
Third Step: Streaming It In
Overview: every frame has a budget of about 10 MB of uploads. The streamer sorts what it wants to load, reads it from disk in chunks, copies the chunks to a staging buffer and then to the GPU. A level only becomes visible when all of it is on the GPU. Levels nobody wants anymore are removed.
Now the details:
- The coarsest level is always there: It's loaded first and never removed, so a model can always draw something, even if it's the ugly version.
- What loads first: Loads already in progress come first, then everything else sorted by the size of the model on the screen. Inside one model, coarse levels load before fine ones so each level lands on top of its parent. A level can't start loading unless the level coarser than it is at least on its way, because the GPU depends on that parent. A hole in the chain shows up as a hole in the model.
- How the bytes travel: A level is cut into chunks (up to 8 MB), each one is read in the background by the job system. A finished read is copied into a shared staging ring (33 MB split in three slices, one for each frame in flight), and then the GPU copies it from the ring into the mesh memory.
- When a level becomes ready: When every chunk arrived and the last copy was queued on a previous frame. The bytes we queue this frame only reach the GPU when the frame is submitted, so marking the level ready in the same frame could let the GPU read memory that is still empty.
- Eviction: A level is removed when nobody asked for it this frame and it has been in memory for at least 60 frames. One more rule: if a finer level stays, everything coarser than it stays too. Same reason, no holes in the chain.
- When something fails: A failed read is retried up to 3 times. After that the level is marked as failed and the coarser level is drawn instead. If the coarsest level itself fails, the model is never drawn and the log says it loud and clear.
My favourite part: when the system can't keep up. If the budget runs out, the memory is full, or the staging ring is full for 120 frames in a row, the global bias goes up by one (up to 4). The bias makes everything ask for a coarser level, so there is less to load and the system recovers instead of freezing. After 120 calm frames, it goes down by one again. It's deliberately slow, because a big load can keep the budget empty for a long time and I don't want the quality to jump up and down.
Regions and LODs are the same idea at two scales. Regions decide what exists in the world, LODs decide how much of each thing sits in memory. Both are a loop of "what do I want, what do I have, move one step closer", and both use a margin so nothing flickers on the boundary.
This is one of the first articles that dives deep into my game engine. If you're interested in other concepts inside my engine, don't hesitate to contact me over email or LinkedIn anytime.