Software Rasterizer: Texturing
Rendering is not only about colors. Sometimes we want to render images too. But as you might expect, that won't be as straightforward as colors due to many reasons:
- Images can easily vary in size
- You may want to downscale or upscale
That said, images cannot be rendered directly; we need to sample them. There are many sampling algorithms, but all of them rely on UV coordinates. I won't go into full detail—you can check a YouTube video on how UV mapping works in the world of 3D. If you've ever used software like Unity, Blender, etc., you've probably seen it.
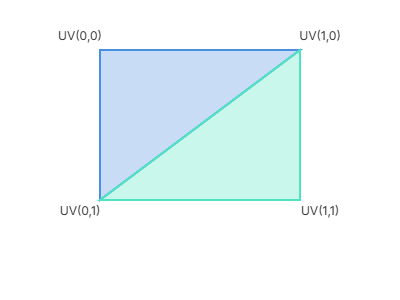
Well, I felt a bit guilty, so let me give a quick explanation. We need a way to tell each vertex which part of the image it will hold. Obviously, we cannot use pixel positions directly because the quad we are filling might be a different size than the actual image. That's where UV coordinates come in. This is another usage of Barycentric Coordinates. We still use weights like we did in the previous post with colors, by adding another point to our Vertex struct called uv.
Vertex.h
struct Vertex {
    Point position;
    Point uv;
    Color color;
};
That's how uv would look like for a quad (what will we use)
Sampling
There are many algorithms used in texture rendering, like nearest, bilinear, and mipmaps (mostly used in GPUs). Nearest is the simplest but the least flexible. We will work with bilinear because it's easier to learn and implement.
Something that needs to be mentioned: Bilinear works by taking the average of 4 texels/pixels around the current UV coordinate, while nearest just picks the closest pixel to the calculated UV.
Use the controls below to change source size, destination size, and toggle bilinear interpolation. The effect will update on all four canvases.
Image Scaling Comparison
Gradient
Source (64x64)
Scaled (256x256)
Checkerboard
Source (16x16)
Scaled (256x256)
Playing with the canvases above reveals an important difference between bilinear and nearest-neighbor sampling. Notice how the checkerboard looks blurred when using bilinear. That's normal since bilinear averages the 4 closest neighbors for each pixel, sharp edges get softened. This averaging is exactly what makes gradients appear smooth, but it also means high-contrast patterns, like a checkerboard, lose their crispness when scaled.
How Bi-linear works?
We mentioned already that images vary in size, and sometimes we need to scale them up or down. The nearest-neighbor algorithm works by simply picking the closest texel. That’s why, as you saw above with gradients, it ends up looking like chunky little squares—each pixel is basically copied and stretched.
Bilinear interpolation takes a different approach. Instead of saying “just grab the nearest texel,” it asks: what if we average between multiple texels to get a smoother result?
The process goes like this:
Blend horizontally across the top row (between top-left and top-right).
- Blend horizontally across the bottom row (between bottom-left and bottom-right).
- Finally, blend vertically between those two results.
When you sample a texture using UV coordinates, most of the time you land between pixels, not exactly on one. Therefore, Bilinear scaling blends these four values based on how close the UV is to each corner.
Wrapping
So far, we have been assuming UV coordinates stay between $0$ and $1$. What if they don't? What if the user used for example $v = -0.2$? We need something to handle these cases (which you may consider them edge cases but maybe they are not). That's where we introduce wrapping. Wrapping decides what happens when UV go outside the default [0,1] range. In our implementation we will use these modes:
- Clamp
- We can think of it like "don't go outside this edge" meaning If UVs are below $0$, they will be treated as $0$. The same happens if it's above $1$, They will be treated as $1$. This mode prevent tiling
- Repeat
- This mode keeps repeating the image like what we say in wallpapers. UVs outside the range get wrapped back inside the image.
- Mirror (Repeat by mirrored)
- Similar to repeat, but instead of tiling the image in the same direction, every second tile is flipped like a mirror.
Now, Let's get back to code. First, we need a way to load images. Luckily, there is a single header called stb_image that can load common image extensions using a single API. You can download it and add it directly to our include folder. In order to use it, We have to do something called STB_IMPLEMENTATION. That header contains both implementation and the functions itself and the file is huge inling all these functions will take ages from the compiler to finish. So, we have to go to one of our CPP files and define a macro there, That macro will define all the header functions inside that CPP, so we can freely. In our main.cpp we add these two lines at the beginning of the file
#define STB_IMAGE_IMPLEMENTATION
#include <stb_image.h>
Let's create a class. we will call it Sampler. We will create a header and and a cpp file for it.
Sampler.h
#pragma once
#include <stb_image.h>
#include <string_view>
#include <memory>

class Sampler {
public:
    static std::shared_ptr<Sampler> loadImage(std::string_view path);

    Sampler() : width(0), height(0), channels(0), pixels(nullptr) {}
    Sampler(const Sampler&) = delete;

    Sampler& operator=(const Sampler&) = delete;

    Sampler& operator=(Sampler&& other) noexcept {
        if (this != &other) {
            if (data) stbi_image_free(data);
            width = other.width;
            height = other.height;
            channels = other.channels;
            data= other.data;

            other.data= nullptr;
            other.width = other.height = other.channels = 0;
        }
        return *this;
    }

    Sampler(Sampler&& other) noexcept
    : width(other.width), height(other.height), channels(other.channels), data(other.data) {
        other.data= nullptr;
    }

    ~Sampler() {
        if (data) {
            stbi_image_free(data);
        }
    }

private:
    size_t width, height, channels;
    uint8_t *data;


};
It just a definition of our sampler class (which is an image + extra)
TBH, I was too lazy to build two different classes. I am planning to refactor most of the code in the future. So, Let's stick to that for now
Let's implement our loadImagefunction in Sampler.cpp
#include <Sampler.h>
#include <stdexcept>
#include <string>
#include <vector>


std::shared_ptr<Sampler> Sampler::loadImage(std::string_view path) {
    int w, h, c;
    unsigned char* imgData = stbi_load(path.data(), &w, &h, &c, 0);

    if (!imgData) {
        throw std::runtime_error("Failed to load image: " + std::string(path));
    }

    auto sampler = std::make_shared<Sampler>();
    sampler->data = imgData;
    sampler->width = static_cast<size_t>(w);
    sampler->height = static_cast<size_t>(h);
    sampler->channels = static_cast<size_t>(c);

    return sampler;
}
Here, I’m just creating an instance of our class, then calling stbi_load, which takes the path as a character array, along with pointers to width, height, and channels. The last parameter, number of desired channels, tells STB how many channels we want in the loaded image. Setting it to zero means we keep all the channels the file already has.
Now, Let's add a simple function called atwhich will give us the color for the current pixel. I will add it inside the header.
class Sampler{
public:
//....
[[nodiscard]] Color at(size_t x, size_t y) const {
        size_t index = (y * width + x) * channels;
        const uint8_t r = pixels[index + 0];
        const uint8_t g = pixels[index + 1];
        const uint8_t b = pixels[index + 2];
        const uint8_t a = (channels == 4) ? pixels[index + 3] : 255;
        return {r, g, b, a};
    }
private:
//....
}
Unlike SDL, STB returns a flat unsigned char buffer, where all pixel data is packed sequentially where each pixel consists of its channel values stored one after another.
Let's make an edit in our draw functions by making them accept a sampler function
void draw_triangle(uint32_t *pixels, int width, int height,
                   const Vertex &v0, const Vertex &v1, const Vertex &v2, std::shared_ptr<Sampler> &sampler);

void draw_indexed(uint32_t *pixels, int width, int height, const std::vector<Vertex> &vertices,
                  const std::vector<int> &indices, std::shared_ptr<Sampler> sampler = nullptr);
In draw_indexed I made the sampler copyable inside the function because we need to be able to provide null directly. That's not the case for draw_triangle as I made it take shared_ptr reference because it will be delivered an empty shared pointer all the time.
Inside draw_indexed implementation. We need to update the draw_triangle call
for (size_t i = 0; i < indices.size(); i += 3) {
        // accessing vertices
        draw_triangle(pixels, width, height, v0, v1, v2, sampler);
    }
Let's now calculate the UV for a texture like we did with a color.
Inside our draw_triangle function:
/// Looping over pixels xy and calculate the weights
if (w0 >= 0 && w1 >= 0 && w2 >= 0) {
	Point uv = v0.uv * w0 + v1.uv * w1 + v2.uv * w2;
	if (sampler) {
		//TODO
	}else {
		float srcR = v0.color.r * w0 + v1.color.r * w1 + v2.color.r * w2;
		float srcG = v0.color.g * w0 + v1.color.g * w1 + v2.color.g * w2;
		float srcB = v0.color.b * w0 + v1.color.b * w1 + v2.color.b * w2;
		float srcA = v0.color.a * w0 + v1.color.a * w1 + v2.color.a * w2;


		// Converting this color to uint32 to be inserted inside the buffer
		pixels[y * width + x] = Color(srcR, srcG, srcB, srcA).to_uint32();
	}

}
Before we go implement the sampling logic. Let's create a utility function to wrap our UV. inside Sampler.h
class Sampler {
    // other stuff...
    void setWrapMode(const WrapMode mode) {
        mode_ = mode;
    }

    Color sampleBilinear(const Point &uv) const;
private:
    [[nodiscard]] float wrapUV(float v) const {
        switch (mode_) {
            case CLAMP:
                return std::max(0.0f, std::min(1.0f, v));
            case REPEAT:
                return v - std::floor(v); // keep in [0,1)
            case MIRROR: {
                float frac = v - std::floor(v);
                int i = static_cast<int>(std::floor(v));
                return (i % 2 == 0) ? frac : 1.0f - frac;
            }
        }
        return v;
    }

    WrapMode mode_ = CLAMP;
};
The parameter $v$ in wrapUV not only for the $v$ function rather it will be used for both $u$ and $v$
Let's head back to an old struct Color. In our Color.h we need a new utility to interpolate between colors.
struct Color{
  // Other stuff....
  [[nodiscard]] static Color lerp(const Color& c1, const Color& c2, float t) {
        t = std::clamp(t, 0.0f, 1.0f);
        auto lerpComp =  [t](uint8_t a, uint8_t b) -> uint8_t {
            return static_cast<uint8_t>(a + (b - a) * t + 0.5f);
        };
        return {
            lerpComp(c1.r, c2.r),
            lerpComp(c1.g, c2.g),
            lerpComp(c1.b, c2.b),
            lerpComp(c1.a, c2.a)
        };
    }
}
Let's head back to our Sampler.h to implement our sample function. The first step will be using the static wrap function we implemented before to wrap our UV
Color Sampler::sampleBilinear(const Point &uv) const {
    float u = wrapUV(uv.x);
    float v = wrapUV(uv.y);
Now, let's convert this UV to a position in the image by multiplying with the image dimensions
float x = u * (width_ - 1.f);
float y = v * (height_ - 1.f);
We need the integer and fractional parts of these coordinates. The integers give us the nearest texel indices, while the fractional parts tell us how far we are between them.
int x0 = static_cast<int>(std::floor(x));
int y0 = static_cast<int>(std::floor(y));
int x1 = std::min(x0 + 1, static_cast<int>(width_ - 1));
int y1 = std::min(y0 + 1, static_cast<int>(height_ - 1));

float fx = x - x0; // fractional offset in x
float fy = y - y0; // fractional offset in y
Next, we fetch the four neighboring texels that surround our UV coordinate. Think of it like a square: top-left, top-right, bottom-left, bottom-right.
Color c00 = at(x0, y0);
Color c10 = at(x1, y0);
Color c01 = at(x0, y1);
Color c11 = at(x1, y1);
Finally, we do the interpolation in two steps: first along the x direction, then along the y direction.
Color cx0 = Color::lerp(c00, c10, fx); // bottom row blend
Color cx1 = Color::lerp(c01, c11, fx); // top row blend
Color c   = Color::lerp(cx0, cx1, fy); // vertical blend
return c;
}
And that’s it. Now, we need to use this function inside our draw_triangle function
if (w0 >= 0 && w1 >= 0 && w2 >= 0) {
    Point uv = v0.uv * w0 + v1.uv * w1 + v2.uv * w2;
    if (sampler) {
        pixels[y * width + x] = sampler->sampleBilinear(uv).to_uint32();
    } else {
        // Calculate coloring
    }
}
We almost ready. Let's try our code in main.cpp
// ....
std::shared_ptr<Sampler> image = Sampler::loadImage("example.png"); // loading the image
while (running) {
    // ....
    std::vector<Vertex> vertices = {
        {Point(100, 300), {255, 0, 0, 255}, {0.0f, 0.0f}}, // Top-left  (Red)
        {Point(200, 300), {255, 0, 0, 255}, {1.0f, 0.0f}}, // Top-right (Green)
        {Point(200, 400), {0, 0, 255, 255}, {1.0f, 1.0f}}, // Bottom-right (Blue)
        {Point(100, 400), {0, 0, 255, 255}, {0.0f, 1.0f}}  // Bottom-left  (Yellow)
    };

    std::vector<int> indices = {
        0, 1, 2, // First triangle
        0, 2, 3  // Second triangle
    };

    draw_indexed(pixels, width, height, vertices, indices, image);
}
If you run the code now you should see your image right, You can play with the quad size and the wrapping to see different size based on your image
Now, It's time for a little action, Let's clear our buffer with black color
clear_pixels(pixels, pitch, height, 0x0);If you used a PNG with transparent background you will see the whole image is rendered with a weird color
That's where we need alpha blending. Maybe it's a little surprise to you but color is $(red,green,blue,alpha)$. Alpha determine how strong is our color $255$ means you cannot see what's behind zero means this color is invisible and values between determine how much we can see the color in the background.
Therefore, we need to mix our color with the background color (or any object drawn before in the same pixel). If alpha is 1, we fully overwrite. If alpha is 0, we leave the background untouched. And if alpha is something in between, we get a weighted mix of the two. Mathematically it’s written as:
$$ final = a \cdot new + (1 - a) \cdot old $$.
I leave you with the code as usual💀
// draw_triangle

// ...
if (w0 >= 0 && w1 >= 0 && w2 >= 0) {
    Point uv = v0.uv * w0 + v1.uv * w1 + v2.uv * w2;
    Color srcColor;

    if (sampler) {
        srcColor = sampler->sampleBilinear(uv);
    } else {
        srcColor = Color(
            v0.color.r * w0 + v1.color.r * w1 + v2.color.r * w2,
            v0.color.g * w0 + v1.color.g * w1 + v2.color.g * w2,
            v0.color.b * w0 + v1.color.b * w1 + v2.color.b * w2,
            v0.color.a * w0 + v1.color.a * w1 + v2.color.a * w2
        );
    }

    // Alpha blending
    // dstColor is the current color in the buffer
    Color dstColor = Color::from_uint32(pixels[y * width + x]);

    // Normalizing alpha
    float srcAlpha = srcColor.a / 255.0f;
    float oneMinusSrcAlpha = 1.0f - srcAlpha;

    // Interpolating new color RGB
    uint8_t r = static_cast<uint8_t>(
        srcColor.r * srcAlpha + dstColor.r * oneMinusSrcAlpha
    );
    uint8_t g = static_cast<uint8_t>(
        srcColor.g * srcAlpha + dstColor.g * oneMinusSrcAlpha
    );
    uint8_t b = static_cast<uint8_t>(
        srcColor.b * srcAlpha + dstColor.b * oneMinusSrcAlpha
    );

    pixels[y * width + x] = Color(r, g, b, 255).to_uint32();
}
The final alpha is 255 as we already done with blending the color
Bonus Part
If you run this code in Debug mode, you may get around 59 FPS, depending on your CPU. In Release mode, you will easily hit the maximum frame rate (limited by VSYNC). That’s fine for rendering a single image, but once you try to render four or five images of different sizes, you’ll notice a significant drop in performance.
To address this issue, I’ll introduce the first SSE SIMD optimization in this series.
Why SSE? Because it’s more than enough for our use case — SSE provides 128-bit registers, which means a single instruction can process multiple color values at once (for example, two pixels). I won’t go into the full explanation here; if you already know the basics of SSE, you’ll be able to understand the code.
#include <emmintrin.h>
Color Sampler::sampleBilinear(const Point &uv) const {
    float u = wrapUV(uv.x);
    float v = wrapUV(uv.y);

    float x = u * (width_ - 1.f);
    float y = v * (height_ - 1.f);

    int x0 = static_cast<int>(std::floor(x));
    int y0 = static_cast<int>(std::floor(y));
    int x1 = std::min(x0 + 1, static_cast<int>(width_ - 1));
    int y1 = std::min(y0 + 1, static_cast<int>(height_ - 1));

    float fx = x - x0;
    float fy = y - y0;

    // Load 4 neighbors as 32-bit RGBA
    Color c00 = at(x0, y0);
    Color c10 = at(x1, y0);
    Color c01 = at(x0, y1);
    Color c11 = at(x1, y1);

    // Convert to float vectors [r,g,b,a]
    auto toVec = [](const Color &c) {
        return _mm_set_ps(c.a, c.b, c.g, c.r); // order: r,g,b,a
    };

    __m128 v00 = toVec(c00);
    __m128 v10 = toVec(c10);
    __m128 v01 = toVec(c01);
    __m128 v11 = toVec(c11);

    __m128 fxv = _mm_set1_ps(fx);
    __m128 fyv = _mm_set1_ps(fy);

    // Horizontal lerp
    __m128 cx0 = _mm_add_ps(v00, _mm_mul_ps(_mm_sub_ps(v10, v00), fxv));
    __m128 cx1 = _mm_add_ps(v01, _mm_mul_ps(_mm_sub_ps(v11, v01), fxv));

    // Vertical lerp
    __m128 cFinal = _mm_add_ps(cx0, _mm_mul_ps(_mm_sub_ps(cx1, cx0), fyv));

    // Round and pack back to uint8
    alignas(16) float out[4];
    _mm_store_ps(out, cFinal);

    return Color(
        static_cast<uint8_t>(std::clamp(out[0], 0.0f, 255.0f)),
        static_cast<uint8_t>(std::clamp(out[1], 0.0f, 255.0f)),
        static_cast<uint8_t>(std::clamp(out[2], 0.0f, 255.0f)),
        static_cast<uint8_t>(std::clamp(out[3], 0.0f, 255.0f))
    );
}